Learn how to cook dried chickpeas with soaking, stovetop, and Instant Pot methods, plus timing, texture tips, and easy storage advice.
How to Cook Dried Chickpeas the Easy Way
A can of chickpeas is convenient, but a bag of dried chickpeas gives you better texture, more control, and usually a lower cost per serving. If you have ever wondered how to cook dried chickpeas without ending up with beans that are still hard in the middle or completely mushy, the good news is that the process is simple once you know what affects the cooking time.
Dried chickpeas, also called garbanzo beans, need more patience than lentils or canned beans, but they reward you with a fresher flavor and a creamier center. They are also one of the most useful pantry staples around. You can turn them into hummus, toss them into salads, add them to soups, or season them for grain bowls and quick lunches.
How to Cook Dried Chickpeas Successfully
The biggest thing to know is that dried chickpeas are not always cooked on a fixed schedule. Their age, how long they have been sitting in your pantry, and whether you soaked them first all change the timing. That is why the best approach is to think in ranges, then test for texture as they cook.
For most home cooks, there are three reliable methods: overnight soaking with stovetop cooking, a quick soak followed by stovetop cooking, or pressure cooking in an Instant Pot. None is universally better. It depends on how much time you have and what texture you want in the final dish.
Start by sorting and rinsing
Before anything else, pour your chickpeas onto a plate or sheet pan and check for small stones, shriveled beans, or debris. Then rinse them well under cool water. It takes less than a minute, and it is worth doing every time.
A standard starting amount is 1 cup of dried chickpeas. That usually yields about 3 cups cooked, though it can vary a little depending on the beans.
Do you have to soak chickpeas?
No, but soaking helps. It shortens the cooking time and tends to cook the beans more evenly. Many cooks also find that soaked chickpeas have a better texture, especially for hummus.
If you skip soaking, your chickpeas will still cook, but expect a longer simmer or pressure cook time. That can be fine for soups or stews when you are not in a rush.
Overnight soak vs quick soak
The overnight soak is the easiest method if you plan ahead. Put the dried chickpeas in a large bowl, cover them with several inches of water, and leave them for 8 to 12 hours. They will expand as they soak, so use more water than you think you need. Drain and rinse before cooking.
If you forgot to soak them, the quick soak method works well. Add the chickpeas to a pot, cover with water by a few inches, and bring to a boil for 2 minutes. Turn off the heat, cover the pot, and let them sit for 1 hour. Then drain and rinse.
The overnight soak is a little more hands-off, while the quick soak is useful when dinner planning did not go as planned.
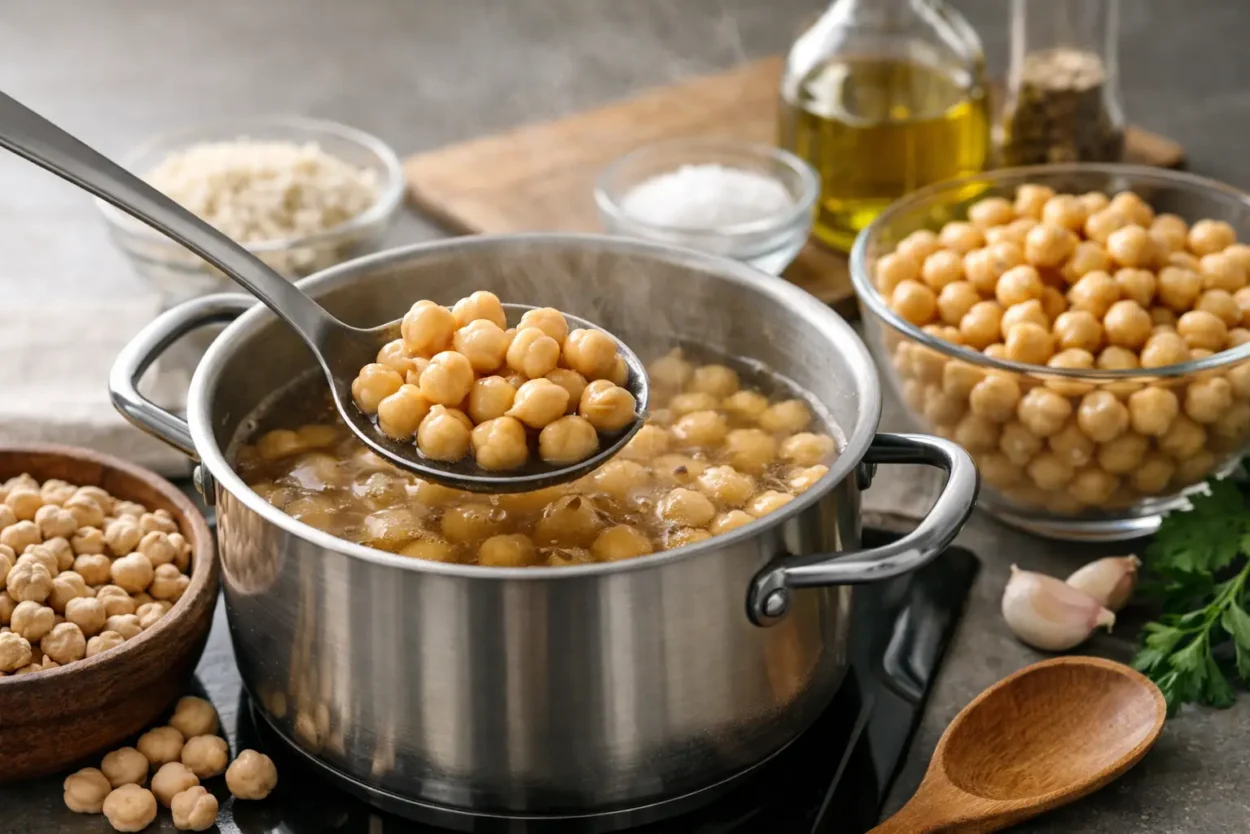
How to cook dried chickpeas on the stove
For many people, the stovetop method gives the best control. Add your soaked and rinsed chickpeas to a large pot and cover them with fresh water by about 2 inches. Bring the pot to a boil, then reduce to a gentle simmer.
Skim off any foam that rises to the top during the first few minutes. It is normal and easy to remove with a spoon. Then let the chickpeas cook uncovered or partially covered, depending on how much liquid is evaporating.
Soaked chickpeas usually take about 1 to 1 1/2 hours on the stove. Unsoaked chickpeas can take 2 hours or longer. Older beans may need even more time, which is why tasting matters more than watching the clock.
If you want firm chickpeas for salads or roasting later, stop cooking when they are tender but still hold their shape. For hummus or very soft stews, let them go longer until they mash easily between your fingers.
When to add salt
There is a lot of advice floating around about salting beans. The simple answer is that you can salt chickpeas during cooking. It does not ruin them. In fact, a little salt in the cooking water can help season them all the way through.
If you have had trouble with tough beans before, it is usually more about old chickpeas or not enough cooking time than the salt itself. Add about 1 to 1 1/2 teaspoons of salt per pot if you want a well-seasoned result.
Optional flavor add-ins
If you want chickpeas that already taste good on their own, simmer them with a few extras. Onion, garlic, a bay leaf, or a small piece of carrot all work nicely. You can also add a drizzle of olive oil, though it is not necessary.
Keep the flavors simple if you want the chickpeas to stay versatile for several meals.
How to cook dried chickpeas in the Instant Pot
If you want a faster, more hands-off option, the Instant Pot is a great choice. Add 1 cup dried chickpeas and about 4 cups water to the pot. For soaked chickpeas, cook on high pressure for about 12 to 15 minutes, then let the pressure release naturally for 10 to 15 minutes.
For unsoaked chickpeas, cook on high pressure for about 35 to 40 minutes with a natural release. If you want them very soft for dips or spreads, add a few extra minutes.
The pressure cooker is especially helpful if you cook beans often and do not always remember to soak ahead. The trade-off is that you have a little less control over checking the texture as they go.
How to tell when chickpeas are done
The best test is to taste one. A cooked chickpea should not feel chalky or grainy in the center. It should be tender all the way through, with the skin intact unless you have cooked it very soft.
Texture matters because different recipes need different results. For soups, firmer is fine because the chickpeas may cook a little more in the broth. For hummus, softer is better because it blends more smoothly. If your goal is crispy roasted chickpeas, cook them until tender but not falling apart.
Common mistakes that affect texture
One of the biggest mistakes is using old beans. Dried chickpeas can sit in the pantry for a long time, but older beans often take much longer to soften. If yours seem to cook forever, age may be the issue.
Another mistake is boiling too aggressively. A hard boil can break the skins and cook the outside faster than the inside. A steady simmer is better.
Not using enough water can also cause uneven cooking. Chickpeas need room to expand and stay submerged. If the water level drops too much, top it off with hot water during cooking.
Should you use baking soda?
Sometimes, yes. A small pinch of baking soda in the soaking water or cooking water can help soften chickpeas faster and create a creamier texture. This is especially helpful for hummus.
The trade-off is that too much baking soda can make the beans overly soft and slightly affect the flavor. If you use it, keep it minimal. About 1/4 teaspoon per cup of dried chickpeas is plenty.
How to store cooked chickpeas
Once the chickpeas are cooked, let them cool in some of their cooking liquid if you want them to stay moist and tender. Then refrigerate them in an airtight container for up to 5 days.
They also freeze well. Portion them into containers or freezer bags with a little cooking liquid, then freeze for up to 3 months. That way you get some of the convenience of canned chickpeas, but with homemade texture and a lower cost.
Easy ways to use them
Cooked chickpeas are one of those ingredients that can save dinner when the fridge looks bare. Stir them into pasta with olive oil and spinach, add them to a grain bowl with roasted vegetables, or mash them lightly with lemon and herbs for a quick lunch.
They also work well in soups, curries, and sheet pan meals. If you make a large batch, you can use one portion for hummus, one for salads, and one for a warm dinner later in the week.
A simple ratio to remember
If you do not want to memorize much, remember this: 1 cup dried chickpeas, plenty of water, and cook until the center is fully tender. Soak first if you can. Taste before draining. Adjust the texture based on what you plan to make.
Once you cook dried chickpeas a couple of times, it stops feeling like a project and starts feeling like one of the easiest money-saving kitchen habits to keep. A bag in the pantry can turn into several meals, and the payoff is worth the extra time.